So I started a new blog (again!), and for the first post I decided to do something small, so I’m starting with Unity Editor scripts.
Unity is a powerful editor on itself, and it has so many functionalities already packed in that sometimes it can be intimidating to use it, and that’s okay, I mean, I don’t even use its whole functionality, because not everything is needed for every game.
But they have what they call Editor Scripting, that lets you extend the Editor functionality and create custom windows, inspectors and all sorts of stuff that can help you speed up your game development. The link above is useful up to Unity 2018.4, in 2019.1 they introduced a new way to work with visuals in the editor called UI Elements and you can find the same example of editor scripting above but using them in 2019.1 so you can compare them yourself.
But we are going to focus in the old way (we’ll talk about UI Elements in the future, I promise!).
We’re going to keep it really simple this time, but the API for editor scripting is really robust, so I suggest you go and read the documentation on them to see what else you can do.
But for now, we’re going to do a simple script that let’s you change the color of a sprite without you having to press Play to see how it looks like with the assigned color.
First we’re going to create a script called ChangeColor to change the color of a sprite at start.
using UnityEngine;

[RequireComponent(typeof(SpriteRenderer))]
public class ChangeColor : MonoBehaviour
{
    [SerializeField]
    private Color newSpriteColor;

    void Start()
    {
        ChangeToNewColor();
    }

    public void ChangeToNewColor()
    {
        GetComponent<SpriteRenderer>().color = newSpriteColor;
    }
}
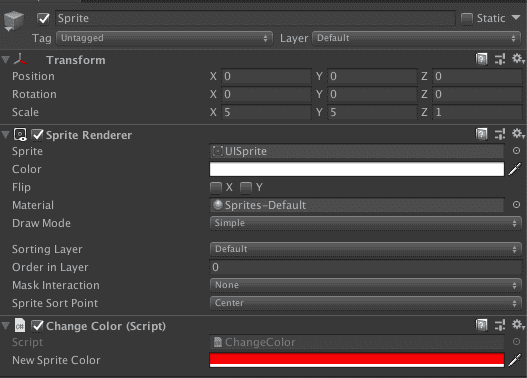
Now we should attach the script to a sprite to test it out and it should look like this:
A few things we notice now, is that we have to play the scene each time we want to try a new object, which can be really bothersome if we have big scenes or if we simply don’t want to keep running the game just to see this change. Also the sprite will change its color just during Play mode, so it won’t persist the change when you stop it.
But we’re going to change that right now with the power of editor scripting!
If you don’t have one, create an Editor folder in your Assets, and now create a new script called ChangeColorEditor inside of it, with the following code inside:
using UnityEditor;
using UnityEngine;

[CustomEditor(typeof(ChangeColor))]
public class ChangeColorEditor : Editor
{
    public override void OnInspectorGUI()
    {
        DrawDefaultInspector();

        if (GUILayout.Button("Change Color"))
        {
            var changeColorScript = target as ChangeColor;
            changeColorScript.ChangeToNewColor();
        }
    }
}
Okay so there is a few things to unpack from here:
- We need the
[CustomEditor(typeof(ChangeColor))]attribute to tell the script which kind of script is going to be associated with. As you can see we are telling the attribute that is going to be a custom editor for ourChangeColorclass. - We are extending our new editor class form the
Editorclass, this is because we need access to certain methods and the script needs to be able to work in the Editor context. - We are overriding the method
OnInspectorGUIto be able to draw in the inspector window of our script. First we call theDrawDefaultInspectorto draw all the things that are already in our script’s inspector like theNew Sprite Colorfield.
After all that setup, now we can start to actually get some new logic into our script. First we create an if with a GUILayout.Button which means that each time that button is clicked our script is going inside that if.
Now inside the if we have just a couple of lines, the first one is calling a target variable, which is the instance of the ChangeColor script that is being affected. Once we have that reference we just call the ChangeToNewColor method, like we did in the start of our script. Save it and now go to the Editor and it should look like this:
Now change the color field to a new color and press the button and you should be looking at your sprite with the new color applied and you didn’t even had to press Play to see it working!
Like I said at first, this is a very simple example, but it gives you some basic concepts of editor scripting. Try to make some more complicated ones by yourself, and if you want to show them to me or just have any question at all don’t doubt to send me an email or a tweet!

